특징

- 업그레이드 및 설치 시, 기존 서비스는 중지한 후 설치함

- 언인스톨러는 설정 > 앱 > 설치된 앱에서 확인 가능

- 언인스톨 시, 기존 서비스를 중지하고 제거함

- GUID가 같으면 설치되지 않음


테스트 서비스 프로그램 만들기

1. Visual Studio 2022 → 새 프로젝트 만들기 → 작업자 서비스 선택하여 프로젝트 생성

2. NuGet 패키지 관리자로 아래 두 개 설치

3. Program.cs 를 아래와 같이 코딩 후 빌드

using WorkerService1;
using Microsoft.Extensions.Hosting.WindowsServices;

var builder = Host.CreateApplicationBuilder(args);
// Windows 서비스로 동작하도록
builder.Services.AddWindowsService(o =>
{
    o.ServiceName = "My Worker Service";
});
builder.Services.AddHostedService<Worker>();

var host = builder.Build();
host.Run();

4. 단일 배포 파일 생성

dotnet publish -c Release -r win-x64 -p:PublishSingleFile=true -p:IncludeNativeLibrariesForSelfExtract=true -p:SelfContained=true


WiX v4 설치 후 구성

다운로드 및 설치 : https://marketplace.visualstudio.com/items?itemName=FireGiant.FireGiantHeatWaveDev17

1. Visual Studio 2022 → 새 프로젝트 만들기 → MSI Package 선택하여 프로젝트 생성

2. 코드 수정 및 빌드

// ExampleComponents.wxs
<!-- ExampleComponents.wxs -->
<Wix xmlns="http://wixtoolset.org/schemas/v4/wxs"
     xmlns:util="http://wixtoolset.org/schemas/v4/wxs/util">
	<Fragment>
		<ComponentGroup Id="ExampleComponents" Directory="INSTALLFOLDER">
			<Component>
				<File Id="Service1"
					  Source="C:\Users\codetronik\source\repos\WorkerService1\WorkerService1\bin\Release\net8.0\win-x64\publish\WorkerService1.exe"
					  KeyPath="yes" />

				<!-- 서비스 등록 -->
				<ServiceInstall
					Name="MyService1"
					DisplayName="My Service"
					Description="Service example"
					Type="ownProcess"
					Start="auto"
					Account="LocalSystem"
					ErrorControl="normal"/>

				<!-- 설치/업그레이드/제거 시 제어 -->
				<ServiceControl
					Name="MyService1"
					Stop="both"
					Start="install"
					Remove="uninstall"
					Wait="yes"/>

			</Component>
		</ComponentGroup>
	</Fragment>
</Wix>

// Folder.wxs
<Wix xmlns="http://wixtoolset.org/schemas/v4/wxs">
	<Fragment>
		<StandardDirectory Id="ProgramFiles64Folder">
			<Directory Id="INSTALLFOLDER"
					   Name="!(bind.Property.Manufacturer) !(bind.Property.ProductName)" />
		</StandardDirectory>
	</Fragment>
</Wix>

// Package.en-us.wxl
<!--
This file contains the declaration of all the localizable strings.
-->
<WixLocalization xmlns="http://wixtoolset.org/schemas/v4/wxl" Culture="en-US">

  <String Id="DowngradeError" Value="A newer version of [ProductName] is already installed." />

</WixLocalization>

// Package.wxs
<Wix xmlns="http://wixtoolset.org/schemas/v4/wxs">
	<Package Id="MyServicePkg"
			 Name="ServiceExample"
			 Manufacturer="Codetronik"
			 Version="1.0.0.0"
			 UpgradeCode="{1B29FC40-CA47-1067-131D-00DD010662DA}">
		<MajorUpgrade Schedule="afterInstallValidate"
					  DowngradeErrorMessage="!(loc.DowngradeError)" />
		<Feature Id="Main">
			<ComponentGroupRef Id="ExampleComponents" />
		</Feature>
	</Package>
</Wix>


VS 2022 17.11.5버전 기준

1. 최신 NDK 다운로드

2. 원본 C:\Program Files (x86)\Android\AndroidNDK\android-ndk-r23c 백업 및 해당 경로에 최신 NDK 덮어 씌우기

3. 텍스트 편집기를 관리자 권한으로 실행 후, 아래 경로를 로드

C:\Program Files\Microsoft Visual Studio\2022\Community\MSBuild\Microsoft\VC\v170\Application Type\Android\3.0\Android.Common.props

isystem 문자열 검색 후, 아래 파란 라인을 삭제

VS 프로젝트 -> 속성페이지 -> C/C++ -> 명령줄 -> 모든 옵션에서 -isystem이 사라진 것을 확인

(최신 NDK와 호환되지 않는 경로 설정을 삭제)

4. 텍스트 편집기를 관리자 권한으로 실행 후, 아래 두 개의 경로를 로드

C:\Program Files\Microsoft Visual Studio\2022\Community\MSBuild\Microsoft\VC\v170\Application Type\Android\3.0\Platforms\ARM\PlatformToolsets\Clang_5_0\toolset.props

C:\Program Files\Microsoft Visual Studio\2022\Community\MSBuild\Microsoft\VC\v170\Application Type\Android\3.0\Platforms\ARM64\PlatformToolsets\Clang_5_0\toolset.props

lib64 문자열 검색 후, 아래처럼 lib\clang\18로 변경 (경로마다 각각 변경)

6. 빌드

1. windows에서 CRLF를 사용한다면, 맥에서도 CRLF로 변경해야함.

Xcode -> Settings -> Text Editing -> Editing -> Default Line Endings을 CRLF로 변경

2. 맥에서는 UTF8(BOM)을 지원하지 않으므로, windows에서 UTF8(BOM)으로 작업하고 있었다면 UTF8로 변경해줘야 함

이 두가지를 맞추지 않으면, git 작업 시 애로사항이 꽃 핀다.

환경: c++20, 최적화 끔(-O0), 릴리즈 빌드

테스트 1

class A
{
public:
    void foo()
    {
        printf("hello %d\n", var);
    }
    void set(int a)
    {
        this->var = a;  
    }
private:
    int var = 100;
};

int main()
{
    A a;
    a.foo();
    A b;
    b = a;
    b.foo();
 }

아래는 IDA 디컴파일

int __fastcall main(int argc, const char **argv, const char **envp)
{
  A a; // [rsp+20h] [rbp-18h] BYREF
  A b; // [rsp+24h] [rbp-14h] BYREF

  A::A(&a);
  A::foo(&a);
  A::A(&b);
  b.var = a.var;
  A::foo(&b);
  return 0;
}

void __fastcall A::A(A *this)
{
  this->var = 100;
}

void __fastcall A::foo(A *this)
{
  printf("hello %d\n", (unsigned int)this->var);
}

스택에 a, b 각 4바이트씩 할당함 (멤버변수 사이즈)

클래스의 함수는 일반적인 함수로 취급 (함수명이 A::foo)

= 연산자에서 대입이 발생

테스트 2

private 변수만 늘리고 컴파일

private:
    int var = 100;
    int var2 = 200;
    int var3 = 300;

아래는 IDA 디컴파일

int __fastcall main(int argc, const char **argv, const char **envp)
{
  A a; // [rsp+20h] [rbp-48h] BYREF
  A b; // [rsp+30h] [rbp-38h] BYREF

  A::A(&a);
  A::foo(&a);
  A::A(&b);
  qmemcpy(&b, &a, sizeof(b));
  A::foo(&b);
  return 0;
}

멤버 변수가 많으면 memcpy로 복사함

테스트 3

class A
{
public:
    A& operator=(const A& a)
    {
        this->var = a.var;
        return *this;
    }
    void foo()
    {
        printf("hello %d\n", var);
    }
    void set(int a)
    {
        this->var = a;
  
    }
private:
    int var = 100;
};

아래는 IDA 디컴파일

int __fastcall main(int argc, const char **argv, const char **envp)
{
  A a; // [rsp+20h] [rbp-18h] BYREF
  A b; // [rsp+24h] [rbp-14h] BYREF

  A::A(&a);
  A::foo(&a);
  A::A(&b);
  A::operator=(&b, &a);
  A::foo(&b);
  return 0;
}

A *__fastcall A::operator=(A *this, const A *a)
{
  this->var = a->var;
  return this;
}

기본 = 연산자가 내가 재정의한 operator=로 대체됨

operator=는 일반적인 함수로 취급 (함수명이 A::operator=)

테스트 4

class A
{
public:
    A& daeip(const A& a)
    {
        this->var = a.var;
        return *this;
    }
    A& operator=(const A& a)
    {
        this->var = a.var;
        return *this;
    }
    void foo()
    {
        printf("hello %d\n", var);
    }
    void set(int a)
    {
        this->var = a;
  
    }
private:
    int var = 100;
};
int main()
{
    A a;
    a.foo();
    A b;
    b = a;
    b.foo();
    A c;
    c.daeip(a);
 }

아래는 IDA 디컴파일

int __fastcall main(int argc, const char **argv, const char **envp)
{
  A a; // [rsp+20h] [rbp-28h] BYREF
  A b; // [rsp+24h] [rbp-24h] BYREF
  A c; // [rsp+28h] [rbp-20h] BYREF

  A::A(&a);
  A::foo(&a);
  A::A(&b);
  A::daeip(&b, &a);
  A::foo(&b);
  A::A(&c);
  A::daeip(&c, &a);
  return 0;
}

daeip 함수와 operator=는 기능적으로 동일함

최적화에 의해 operator= 가 삭제되고 daeip 함수로 통일됨

테스트 5

class A
{
public:
    void daeip(const A& a)
    {
        this->var = a.var;
    }
    void operator=(const A& a)
    {
        this->var = a.var;
    }
    void foo()
    {
        printf("hello %d\n", var);
    }
    void set(int a)
    {
        this->var = a;
  
    }
private:
    int var = 100;
};

int main()
{
    A a;
    a.foo();
    A b;
    b = a;
    b.foo();
    A c;
    c.daeip(a);
}

아래는 IDA 디컴파일

int __fastcall main(int argc, const char **argv, const char **envp)
{
  A a; // [rsp+20h] [rbp-28h] BYREF
  A b; // [rsp+24h] [rbp-24h] BYREF
  A c; // [rsp+28h] [rbp-20h] BYREF

  A::A(&a);
  A::foo(&a);
  A::A(&b);
  A::daeip(&b, &a);
  A::foo(&b);
  A::A(&c);
  A::daeip(&c, &a);
  return 0;
}

b = a 처럼 단순 대입만 할 경우 operator=의 리턴값을 void로 해도 무방하다.

테스트6

class A
{
public:  
    void foo()
    {
        printf("hello %d\n", var);
    }
    void set(int a)
    {
        this->var = a;  
    }
private:
    int var = 100;
};

int main()
{
    A a;
    a.foo();
    A& b = a;
    b.foo();
}

아래는 IDA 디컴파일

int __fastcall main(int argc, const char **argv, const char **envp)
{
  A a; // [rsp+28h] [rbp-20h] BYREF

  A::A(&a);
  A::foo(&a);
  A::foo(&a);
  return 0;
}

A& b를 A a로 인식함

테스트7

class A
{
public: 
    A& operator=(const A& a)
    {
        this->var = a.var;
        return *this;
    }
    void foo()
    {
        printf("hello %d\n", var);
    }
    void set(int a)
    {
        this->var = a;  
    }
private:
    int var = 100;
};

아래는 IDA 디컴파일

int __fastcall main(int argc, const char **argv, const char **envp)
{
  A a; // [rsp+28h] [rbp-20h] BYREF

  A::A(&a);
  A::foo(&a);
  A::foo(&a);
  return 0;
}

재정의를 해도 참조 연산 기능이 동일하여  바이너리 결과는 같음


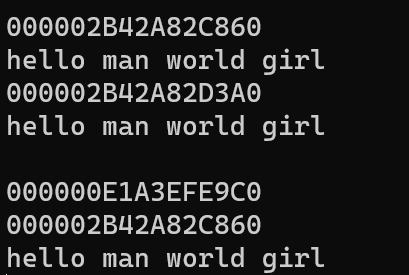
	string a = "hello man world girl";

	cout << static_cast<void*>(a.data()) << endl;
	cout << a << endl;

	string b = a;
	cout << static_cast<void*>(b.data()) << endl;
	cout << b << endl;

	string c = move(a);
	cout << a << endl;
   	cout << static_cast<void*>(a.data()) << endl;
	cout << static_cast<void*>(c.data()) << endl;
	cout << c << endl;

b = a을 하게 되면 복사가 일어난다. 즉, 객체의 생성 -> 복사 -> 파괴가 두번 발생한다.

move 의 경우, 객체의 생성 후 이동만 발생한다. a의 allocator가 c로 이동되며, 이동 후 a의 allocator에는 빈 값과 빈 버퍼가 들어간다. 


'Windows > Dev' 카테고리의 다른 글

windows + mac 동시 개발 시 주의 사항  (0) 2024.10.15
[MSVC] 클래스 고찰 & 디컴파일  (0) 2024.08.08
detours 빌드 및 적용  (0) 2024.04.11
[Visual Studio 2022] curl 빌드  (0) 2023.01.30
[VC++] string deallocate  (0) 2022.05.23

x64 Native Tools Command Prompt for VS 2022 실행

git clone https://github.com/Microsoft/Detours.git
cd detours
nmake

VS 2022로 Detours\vc\Detours.sln 오픈 후, x64, x86 각각 빌드


VS에서 새 DLL 프로젝트를 만들고, 해당 디렉토리에 아래의 파일을 복사

Detours\lib.X??\*.lib
Detours\include\*.h

속성 -> 링커 -> 입력 -> 추가 종속성에 아래의 파일을 추가

detours.lib
syelog.lib

아래와 같이 후킹 코드를 작성하고 빌드한다.

#include "pch.h"
#include <stdio.h>
#include "detours.h"

HANDLE(WINAPI* OrgCreateFileW)(LPCWSTR, DWORD, DWORD, LPSECURITY_ATTRIBUTES, DWORD, DWORD, HANDLE) = CreateFileW;

HANDLE WINAPI MyCreateFileW(
    _In_ LPCWSTR lpFileName,
    _In_ DWORD dwDesiredAccess,
    _In_ DWORD dwShareMode,
    _In_opt_ LPSECURITY_ATTRIBUTES lpSecurityAttributes,
    _In_ DWORD dwCreationDisposition,
    _In_ DWORD dwFlagsAndAttributes,
    _In_opt_ HANDLE hTemplateFile
)
{
    wprintf(L"%s\n", lpFileName);    
    return OrgCreateFileW(lpFileName, dwDesiredAccess, dwShareMode, lpSecurityAttributes, dwCreationDisposition, dwFlagsAndAttributes, hTemplateFile);
}

BOOL Start()
{
    AllocConsole();
    FILE* fp;
    freopen_s(&fp, "CONOUT$", "w", stdout);
 
    DetourRestoreAfterWith();
    DetourTransactionBegin();
    DetourUpdateThread(GetCurrentThread());
    DetourAttach(&(PVOID&)OrgCreateFileW, MyCreateFileW);
    DetourTransactionCommit();
    return TRUE;
}

BOOL APIENTRY DllMain( HMODULE hModule,
                       DWORD  ul_reason_for_call,
                       LPVOID lpReserved
                     )
{

    switch (ul_reason_for_call)
    {
    case DLL_PROCESS_ATTACH:
        Start();
        break;
    case DLL_THREAD_ATTACH:
    case DLL_THREAD_DETACH:
    case DLL_PROCESS_DETACH:
        break;
    }
    return TRUE;
}

아래의 DLL Injector로 테스트가 가능하다.


GitHub - TarekExister/UWP-Dll-Injector-32bit-64bit: universal windows platform (uwp) apps Dll injector [32bit-64bit]

universal windows platform (uwp) apps Dll injector [32bit-64bit] - TarekExister/UWP-Dll-Injector-32bit-64bit

github.com


'Windows > Dev' 카테고리의 다른 글

[MSVC] 클래스 고찰 & 디컴파일  (0) 2024.08.08
[VC++] 문자열 복사, 이동  (0) 2024.05.09
[Visual Studio 2022] curl 빌드  (0) 2023.01.30
[VC++] string deallocate  (0) 2022.05.23
get EIP (gcc / vc)  (0) 2019.04.11

x64 Native Tools Command Prompt for VS 2022 프롬프트 실행

git clone https://github.com/curl/curl.git
cd curl
buildconf.bat
Set RTLIBCFG=static
cd winbuild
nmake /f MakeFile.vc mode=static vc=17

빌드는 아래 경로에 생성 됨

curl\builds\libcurl-vc17-x64-release-static-ipv6-sspi-schannel

curl.zip
1.25MB

프로젝트 설정

#include <curl.h>
int main()
{
    CURL* curl = curl_easy_init();
    CURLcode res;
}


'Windows > Dev' 카테고리의 다른 글

[VC++] 문자열 복사, 이동  (0) 2024.05.09
detours 빌드 및 적용  (0) 2024.04.11
[VC++] string deallocate  (0) 2022.05.23
get EIP (gcc / vc)  (0) 2019.04.11
x86 __usercall 함수 후킹하기  (0) 2017.05.11

deallocate시 문자열 길이 단위는 0x10이며, 문자열 길이가 0x10이하면 _Count 에는 1이 들어가고, _Deallocate를 호출하면서 0x10 * 1하여 0x10 사이즈로 deallocate를 하게 된다.

예시)  string abc = "this is";

_Ptr은 이중 포인터이며, &abc의 주소를 담고 있다.

길이가 0x10을 초과하는 경우 param에 블록단위(0x10의 배수)가 들어간다.

예시) string abc = "live a live is not fun"; // 22바이트


긴 사이즈에서 짧은 사이즈로 리사이즈 하는 경우, 최초에 할당한 길이로 deallocate가 한 번만 수행된다.

string abc = "live a live is not fun";
abc = "papa";

vc++에서는 문자열의 길이를 deallocate의 인자로 확인할 수 없으므로, deallocate 재정의를 통한 memory wipe는 수행할 수 없다.

namespace secure
{
    template <class T> class allocator : public std::allocator<T>
    {
    public:

        template<class U> struct rebind { typedef allocator<U> other; };
        allocator() throw() {}
        allocator(const allocator&) throw() {}
        template <class U> allocator(const allocator<U>&) throw() {}

        void deallocate(T* const p, size_t _Count)
        {            
            memset((void*)p, 0, _Count); // _Count가 문자열 길이를 뜻하는 것이 아니다                    
            std::allocator<T>::deallocate(p, _Count);
        }
    };

    typedef std::basic_string<char, std::char_traits<char>, allocator<char> > string;
}


'Windows > Dev' 카테고리의 다른 글

detours 빌드 및 적용  (0) 2024.04.11
[Visual Studio 2022] curl 빌드  (0) 2023.01.30
get EIP (gcc / vc)  (0) 2019.04.11
x86 __usercall 함수 후킹하기  (0) 2017.05.11
[C] 컴파일러 별 자료형 크기 비교  (0) 2017.03.14

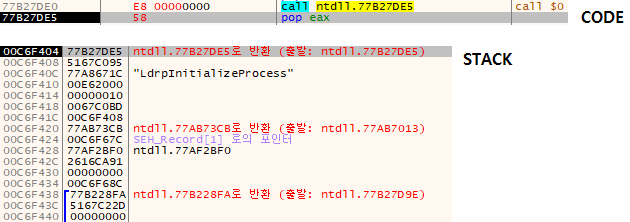
E8 00 00 00 00 이 실행되면 스택에 다음 명령어의 EIP가 push되므로, pop으로 꺼내 쓰면 됨.


ida에서 __usercall로 해석되는 함수의 경우는 2~3개 정도의 인자를 불특정 레지스터에 저장하고 사용하기 때문에
C에서 제공하는 calling convention으로 함수를 정의할 수 없었습니다.
(있다면 댓글로 자비좀 베풀어주세요.. )

어쩔 수 없이 naked형태로 후킹 함수를 구현하였습니다.


후킹 대상인 __usercall 함수는 4개의 인자를 사용하고 있습니다.
int __usercall 대상함수(int a1@<edx>, int a2@<esi>, int a3, int a4)
호출 시 레지스터는 유지하고, a3, a4만 push합니다.
호출이 끝나면 push한 만큼 esp를 복원해주고(hook함수 종료 시 mov esp, ebp를 해주니 복원할 필요가 없을듯하나 습관적으로 해주는것이 좋을듯) , 리턴값이 담긴 eax를 백업합니다.
esi와 edx는 __usercall 함수 내부에서 retn전에 pop을 해주기 때문에 따로 백업하지 않아도 됩니다.

이후에 각종 파라미터를 빼내는 함수를 호출하는데, __stdcall로 선언했으므로 따로 스택정리는 하지 않았습니다. 

 pTrampoline는 jmp 다음 명령어를 가리키도록 해주면 됩니다.


+ Recent posts