제목 설명
Empty Static Library for Drivers (Universal) 유니버설 드라이버용 정적 드라이버 라이브러리를 만들기 위한 빈 프로젝트
WinUSB Application (Universal) USB 장치에 액세스하기 위한 유니버설 애플리케이션 스켈레톤
Kernel Mode Driver, USB (KMDF) Kernel-Mode Driver Framework(KMDF)를 사용하는 USB 장치 프로젝트. 기본값으로 유니버설 드라이버로 빌드됨
Filter Driver: NDIS NDIS 필터 드라이버용 프로젝트. 기본값으로 유니버설 드라이버로 빌드됨
User Mode Driver, USB (UMDF v2) User-Mode Driver Framework v2(UMDF2)를 사용하는 USB 장치 프로젝트. 기본값으로 유니버설 드라이버로 빌드됨
Driver Install Package 하나 이상의 드라이버 프로젝트에서 생성된 드라이버 파일을 포함하는 드라이버 패키지를 만드는 프로젝트
WinUSB INF Driver Package USB 장치에 WinUSB를 로드하는 데 사용할 수 있는 .INF 파일을 드라이버 패키지에 생성
Kernel Mode Driver (KMDF) Kernel-Mode Driver Framework(KMDF)를 사용하는 기본 프로젝트. 기본값으로 유니버설 드라이버로 빌드됨
Kernel Mode Driver, Empty (KMDF) Kernel-Mode Driver Framework(KMDF)를 사용하는 빈 프로젝트. 기본값으로 유니버설 드라이버로 빌드됨
User Mode Driver (UMDF v2) User-Mode Driver Framework v2(UMDF2)를 사용하는 기본 프로젝트. 기본값으로 유니버설 드라이버로 빌드됨
User Mode Driver, Empty (UMDF v2) User-Mode Driver Framework v2(UMDF2)를 사용하는 빈 프로젝트. 기본값으로 유니버설 드라이버로 빌드됨
Empty WDM Driver WDM 드라이버를 만들기 위한 빈 프로젝트
Printer Driver v4 V4 프린터 드라이버 프로젝트(GPD 또는 PPD 기반). 프린터 드라이버는 Windows 데스크톱 장치에서만 실행 가능
Printer Driver v4 Property Bag V4 프린터 드라이버의 프로퍼티 백(project) 프로젝트. 프린터 드라이버는 Windows 데스크톱 장치에서만 실행 가능
Printer XPS Render Filter 프린터 드라이버용 XPS 렌더 필터 프로젝트. 프린터 드라이버는 Windows 데스크톱 장치에서만 실행 가능
Empty Desktop Application for Drivers (Universal) 유니버설 드라이버와 상호작용하는 애플리케이션을 만들기 위한 빈 프로젝트


특징

- 업그레이드 및 설치 시, 기존 서비스는 중지한 후 설치함

- 언인스톨러는 설정 > 앱 > 설치된 앱에서 확인 가능

- 언인스톨 시, 기존 서비스를 중지하고 제거함

- GUID가 같으면 설치되지 않음


테스트 서비스 프로그램 만들기

1. Visual Studio 2022 → 새 프로젝트 만들기 → 작업자 서비스 선택하여 프로젝트 생성

2. NuGet 패키지 관리자로 아래 두 개 설치

3. Program.cs 를 아래와 같이 코딩 후 빌드

using WorkerService1;
using Microsoft.Extensions.Hosting.WindowsServices;

var builder = Host.CreateApplicationBuilder(args);
// Windows 서비스로 동작하도록
builder.Services.AddWindowsService(o =>
{
    o.ServiceName = "My Worker Service";
});
builder.Services.AddHostedService<Worker>();

var host = builder.Build();
host.Run();

4. 단일 배포 파일 생성

dotnet publish -c Release -r win-x64 -p:PublishSingleFile=true -p:IncludeNativeLibrariesForSelfExtract=true -p:SelfContained=true


WiX v4 설치 후 구성

다운로드 및 설치 : https://marketplace.visualstudio.com/items?itemName=FireGiant.FireGiantHeatWaveDev17

1. Visual Studio 2022 → 새 프로젝트 만들기 → MSI Package 선택하여 프로젝트 생성

2. 코드 수정 및 빌드

// ExampleComponents.wxs
<!-- ExampleComponents.wxs -->
<Wix xmlns="http://wixtoolset.org/schemas/v4/wxs"
     xmlns:util="http://wixtoolset.org/schemas/v4/wxs/util">
	<Fragment>
		<ComponentGroup Id="ExampleComponents" Directory="INSTALLFOLDER">
			<Component>
				<File Id="Service1"
					  Source="C:\Users\codetronik\source\repos\WorkerService1\WorkerService1\bin\Release\net8.0\win-x64\publish\WorkerService1.exe"
					  KeyPath="yes" />

				<!-- 서비스 등록 -->
				<ServiceInstall
					Name="MyService1"
					DisplayName="My Service"
					Description="Service example"
					Type="ownProcess"
					Start="auto"
					Account="LocalSystem"
					ErrorControl="normal"/>

				<!-- 설치/업그레이드/제거 시 제어 -->
				<ServiceControl
					Name="MyService1"
					Stop="both"
					Start="install"
					Remove="uninstall"
					Wait="yes"/>

			</Component>
		</ComponentGroup>
	</Fragment>
</Wix>

// Folder.wxs
<Wix xmlns="http://wixtoolset.org/schemas/v4/wxs">
	<Fragment>
		<StandardDirectory Id="ProgramFiles64Folder">
			<Directory Id="INSTALLFOLDER"
					   Name="!(bind.Property.Manufacturer) !(bind.Property.ProductName)" />
		</StandardDirectory>
	</Fragment>
</Wix>

// Package.en-us.wxl
<!--
This file contains the declaration of all the localizable strings.
-->
<WixLocalization xmlns="http://wixtoolset.org/schemas/v4/wxl" Culture="en-US">

  <String Id="DowngradeError" Value="A newer version of [ProductName] is already installed." />

</WixLocalization>

// Package.wxs
<Wix xmlns="http://wixtoolset.org/schemas/v4/wxs">
	<Package Id="MyServicePkg"
			 Name="ServiceExample"
			 Manufacturer="Codetronik"
			 Version="1.0.0.0"
			 UpgradeCode="{1B29FC40-CA47-1067-131D-00DD010662DA}">
		<MajorUpgrade Schedule="afterInstallValidate"
					  DowngradeErrorMessage="!(loc.DowngradeError)" />
		<Feature Id="Main">
			<ComponentGroupRef Id="ExampleComponents" />
		</Feature>
	</Package>
</Wix>


VS 2022 17.11.5버전 기준

1. 최신 NDK 다운로드

2. 원본 C:\Program Files (x86)\Android\AndroidNDK\android-ndk-r23c 백업 및 해당 경로에 최신 NDK 덮어 씌우기

3. 텍스트 편집기를 관리자 권한으로 실행 후, 아래 경로를 로드

C:\Program Files\Microsoft Visual Studio\2022\Community\MSBuild\Microsoft\VC\v170\Application Type\Android\3.0\Android.Common.props

isystem 문자열 검색 후, 아래 파란 라인을 삭제

VS 프로젝트 -> 속성페이지 -> C/C++ -> 명령줄 -> 모든 옵션에서 -isystem이 사라진 것을 확인

(최신 NDK와 호환되지 않는 경로 설정을 삭제)

4. 텍스트 편집기를 관리자 권한으로 실행 후, 아래 두 개의 경로를 로드

C:\Program Files\Microsoft Visual Studio\2022\Community\MSBuild\Microsoft\VC\v170\Application Type\Android\3.0\Platforms\ARM\PlatformToolsets\Clang_5_0\toolset.props

C:\Program Files\Microsoft Visual Studio\2022\Community\MSBuild\Microsoft\VC\v170\Application Type\Android\3.0\Platforms\ARM64\PlatformToolsets\Clang_5_0\toolset.props

lib64 문자열 검색 후, 아래처럼 lib\clang\18로 변경 (경로마다 각각 변경)

6. 빌드

1. windows에서 CRLF를 사용한다면, 맥에서도 CRLF로 변경해야함.

Xcode -> Settings -> Text Editing -> Editing -> Default Line Endings을 CRLF로 변경

2. 맥에서는 UTF8(BOM)을 지원하지 않으므로, windows에서 UTF8(BOM)으로 작업하고 있었다면 UTF8로 변경해줘야 함

이 두가지를 맞추지 않으면, git 작업 시 애로사항이 꽃 핀다.

환경: c++20, 최적화 끔(-O0), 릴리즈 빌드

테스트 1

class A
{
public:
    void foo()
    {
        printf("hello %d\n", var);
    }
    void set(int a)
    {
        this->var = a;  
    }
private:
    int var = 100;
};

int main()
{
    A a;
    a.foo();
    A b;
    b = a;
    b.foo();
 }

아래는 IDA 디컴파일

int __fastcall main(int argc, const char **argv, const char **envp)
{
  A a; // [rsp+20h] [rbp-18h] BYREF
  A b; // [rsp+24h] [rbp-14h] BYREF

  A::A(&a);
  A::foo(&a);
  A::A(&b);
  b.var = a.var;
  A::foo(&b);
  return 0;
}

void __fastcall A::A(A *this)
{
  this->var = 100;
}

void __fastcall A::foo(A *this)
{
  printf("hello %d\n", (unsigned int)this->var);
}

스택에 a, b 각 4바이트씩 할당함 (멤버변수 사이즈)

클래스의 함수는 일반적인 함수로 취급 (함수명이 A::foo)

= 연산자에서 대입이 발생

테스트 2

private 변수만 늘리고 컴파일

private:
    int var = 100;
    int var2 = 200;
    int var3 = 300;

아래는 IDA 디컴파일

int __fastcall main(int argc, const char **argv, const char **envp)
{
  A a; // [rsp+20h] [rbp-48h] BYREF
  A b; // [rsp+30h] [rbp-38h] BYREF

  A::A(&a);
  A::foo(&a);
  A::A(&b);
  qmemcpy(&b, &a, sizeof(b));
  A::foo(&b);
  return 0;
}

멤버 변수가 많으면 memcpy로 복사함

테스트 3

class A
{
public:
    A& operator=(const A& a)
    {
        this->var = a.var;
        return *this;
    }
    void foo()
    {
        printf("hello %d\n", var);
    }
    void set(int a)
    {
        this->var = a;
  
    }
private:
    int var = 100;
};

아래는 IDA 디컴파일

int __fastcall main(int argc, const char **argv, const char **envp)
{
  A a; // [rsp+20h] [rbp-18h] BYREF
  A b; // [rsp+24h] [rbp-14h] BYREF

  A::A(&a);
  A::foo(&a);
  A::A(&b);
  A::operator=(&b, &a);
  A::foo(&b);
  return 0;
}

A *__fastcall A::operator=(A *this, const A *a)
{
  this->var = a->var;
  return this;
}

기본 = 연산자가 내가 재정의한 operator=로 대체됨

operator=는 일반적인 함수로 취급 (함수명이 A::operator=)

테스트 4

class A
{
public:
    A& daeip(const A& a)
    {
        this->var = a.var;
        return *this;
    }
    A& operator=(const A& a)
    {
        this->var = a.var;
        return *this;
    }
    void foo()
    {
        printf("hello %d\n", var);
    }
    void set(int a)
    {
        this->var = a;
  
    }
private:
    int var = 100;
};
int main()
{
    A a;
    a.foo();
    A b;
    b = a;
    b.foo();
    A c;
    c.daeip(a);
 }

아래는 IDA 디컴파일

int __fastcall main(int argc, const char **argv, const char **envp)
{
  A a; // [rsp+20h] [rbp-28h] BYREF
  A b; // [rsp+24h] [rbp-24h] BYREF
  A c; // [rsp+28h] [rbp-20h] BYREF

  A::A(&a);
  A::foo(&a);
  A::A(&b);
  A::daeip(&b, &a);
  A::foo(&b);
  A::A(&c);
  A::daeip(&c, &a);
  return 0;
}

daeip 함수와 operator=는 기능적으로 동일함

최적화에 의해 operator= 가 삭제되고 daeip 함수로 통일됨

테스트 5

class A
{
public:
    void daeip(const A& a)
    {
        this->var = a.var;
    }
    void operator=(const A& a)
    {
        this->var = a.var;
    }
    void foo()
    {
        printf("hello %d\n", var);
    }
    void set(int a)
    {
        this->var = a;
  
    }
private:
    int var = 100;
};

int main()
{
    A a;
    a.foo();
    A b;
    b = a;
    b.foo();
    A c;
    c.daeip(a);
}

아래는 IDA 디컴파일

int __fastcall main(int argc, const char **argv, const char **envp)
{
  A a; // [rsp+20h] [rbp-28h] BYREF
  A b; // [rsp+24h] [rbp-24h] BYREF
  A c; // [rsp+28h] [rbp-20h] BYREF

  A::A(&a);
  A::foo(&a);
  A::A(&b);
  A::daeip(&b, &a);
  A::foo(&b);
  A::A(&c);
  A::daeip(&c, &a);
  return 0;
}

b = a 처럼 단순 대입만 할 경우 operator=의 리턴값을 void로 해도 무방하다.

테스트6

class A
{
public:  
    void foo()
    {
        printf("hello %d\n", var);
    }
    void set(int a)
    {
        this->var = a;  
    }
private:
    int var = 100;
};

int main()
{
    A a;
    a.foo();
    A& b = a;
    b.foo();
}

아래는 IDA 디컴파일

int __fastcall main(int argc, const char **argv, const char **envp)
{
  A a; // [rsp+28h] [rbp-20h] BYREF

  A::A(&a);
  A::foo(&a);
  A::foo(&a);
  return 0;
}

A& b를 A a로 인식함

테스트7

class A
{
public: 
    A& operator=(const A& a)
    {
        this->var = a.var;
        return *this;
    }
    void foo()
    {
        printf("hello %d\n", var);
    }
    void set(int a)
    {
        this->var = a;  
    }
private:
    int var = 100;
};

아래는 IDA 디컴파일

int __fastcall main(int argc, const char **argv, const char **envp)
{
  A a; // [rsp+28h] [rbp-20h] BYREF

  A::A(&a);
  A::foo(&a);
  A::foo(&a);
  return 0;
}

재정의를 해도 참조 연산 기능이 동일하여  바이너리 결과는 같음


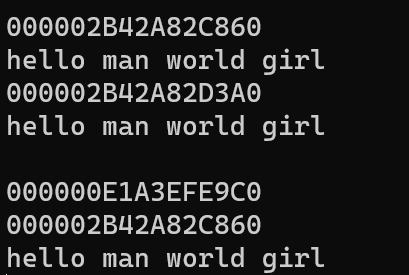
	string a = "hello man world girl";

	cout << static_cast<void*>(a.data()) << endl;
	cout << a << endl;

	string b = a;
	cout << static_cast<void*>(b.data()) << endl;
	cout << b << endl;

	string c = move(a);
	cout << a << endl;
   	cout << static_cast<void*>(a.data()) << endl;
	cout << static_cast<void*>(c.data()) << endl;
	cout << c << endl;

b = a을 하게 되면 복사가 일어난다. 즉, 객체의 생성 -> 복사 -> 파괴가 두번 발생한다.

move 의 경우, 객체의 생성 후 이동만 발생한다. a의 allocator가 c로 이동되며, 이동 후 a의 allocator에는 빈 값과 빈 버퍼가 들어간다. 


'Windows > Dev' 카테고리의 다른 글

windows + mac 동시 개발 시 주의 사항  (0) 2024.10.15
[MSVC] 클래스 고찰 & 디컴파일  (0) 2024.08.08
detours 빌드 및 적용  (0) 2024.04.11
[Visual Studio 2022] curl 빌드  (0) 2023.01.30
[VC++] string deallocate  (0) 2022.05.23

x64 Native Tools Command Prompt for VS 2022 실행

git clone https://github.com/Microsoft/Detours.git
cd detours
nmake

VS 2022로 Detours\vc\Detours.sln 오픈 후, x64, x86 각각 빌드


VS에서 새 DLL 프로젝트를 만들고, 해당 디렉토리에 아래의 파일을 복사

Detours\lib.X??\*.lib
Detours\include\*.h

속성 -> 링커 -> 입력 -> 추가 종속성에 아래의 파일을 추가

detours.lib
syelog.lib

아래와 같이 후킹 코드를 작성하고 빌드한다.

#include "pch.h"
#include <stdio.h>
#include "detours.h"

HANDLE(WINAPI* OrgCreateFileW)(LPCWSTR, DWORD, DWORD, LPSECURITY_ATTRIBUTES, DWORD, DWORD, HANDLE) = CreateFileW;

HANDLE WINAPI MyCreateFileW(
    _In_ LPCWSTR lpFileName,
    _In_ DWORD dwDesiredAccess,
    _In_ DWORD dwShareMode,
    _In_opt_ LPSECURITY_ATTRIBUTES lpSecurityAttributes,
    _In_ DWORD dwCreationDisposition,
    _In_ DWORD dwFlagsAndAttributes,
    _In_opt_ HANDLE hTemplateFile
)
{
    wprintf(L"%s\n", lpFileName);    
    return OrgCreateFileW(lpFileName, dwDesiredAccess, dwShareMode, lpSecurityAttributes, dwCreationDisposition, dwFlagsAndAttributes, hTemplateFile);
}

BOOL Start()
{
    AllocConsole();
    FILE* fp;
    freopen_s(&fp, "CONOUT$", "w", stdout);
 
    DetourRestoreAfterWith();
    DetourTransactionBegin();
    DetourUpdateThread(GetCurrentThread());
    DetourAttach(&(PVOID&)OrgCreateFileW, MyCreateFileW);
    DetourTransactionCommit();
    return TRUE;
}

BOOL APIENTRY DllMain( HMODULE hModule,
                       DWORD  ul_reason_for_call,
                       LPVOID lpReserved
                     )
{

    switch (ul_reason_for_call)
    {
    case DLL_PROCESS_ATTACH:
        Start();
        break;
    case DLL_THREAD_ATTACH:
    case DLL_THREAD_DETACH:
    case DLL_PROCESS_DETACH:
        break;
    }
    return TRUE;
}

아래의 DLL Injector로 테스트가 가능하다.


GitHub - TarekExister/UWP-Dll-Injector-32bit-64bit: universal windows platform (uwp) apps Dll injector [32bit-64bit]

universal windows platform (uwp) apps Dll injector [32bit-64bit] - TarekExister/UWP-Dll-Injector-32bit-64bit

github.com


'Windows > Dev' 카테고리의 다른 글

[MSVC] 클래스 고찰 & 디컴파일  (0) 2024.08.08
[VC++] 문자열 복사, 이동  (0) 2024.05.09
[Visual Studio 2022] curl 빌드  (0) 2023.01.30
[VC++] string deallocate  (0) 2022.05.23
get EIP (gcc / vc)  (0) 2019.04.11

x64 Native Tools Command Prompt for VS 2022 오픈

editbin /dynamicbase:NO FSViewer1.exe


0. Windows 11 에서 정상적인 실행이 되지 않으므로, hyper-V 등을 통해서 windows 10에서 실행하는 것을 권장한다.

1. 다운로드 : Python3, Visual studio 2022, DynamoRIO(https://github.com/DynamoRIO/dynamorio/releases)

2. 적절한 경로에 DynamoRIO 압축 해제

3. config.h 에서 input 파일 최대 사이즈 수정  (1*1024*1024 를 아래와 같이 수정)

/* Maximum size of input file, in bytes (keep under 100MB): */

#define MAX_FILE            (100 * 1024 * 1024)

4. x64 Native Tools Command Prompt for VS 2022 열기

git clone https://github.com/googleprojectzero/winafl
cd winafl
git submodule update --init --recursive
mkdir build64
cd build64
cmake -G"Visual Studio 17 2022" -A x64 .. -DDynamoRIO_DIR=I:\DynamoRIO\cmake -DTINYINST=1 -DUSE_DRSYMS=1 -DINTELPT=1 -DUSE_COLOR=1
cmake --build . --config Release

5. harness 작성

#include <iostream>
#include <windows.h>

typedef int(__stdcall* _OHMYGOD)(const char* data); 
_OHMYGOD func;

extern "C" __declspec(dllexport) __declspec(noinline) int fuzzme(const char* path)
{   
    int result = func(path);
    return result;
}

int main(int argc, char *argv[])
{    
    HMODULE hMod = GetModuleHandle(0);
   
    hMod = LoadLibrary(L"I:\\victim\\x64\\Release\\victim.dll");
    if (NULL == hMod)
    {
        printf("dll load error\n");
        return 0;
    }
   
    func = (_OHMYGOD)GetProcAddress(hMod, "ohmygod");
    fuzzme(argv[1]);    
}

6. victim 작성 (타겟 DLL)

#include "pch.h"
#include <iostream>

extern "C" __declspec(dllexport) int ohmygod(const char* path)
{
    std::cout << path << std::endl;
    char data[40] = { 0, };
    char buf[30] = { 0, };
    
    HANDLE hFile = CreateFileA(path, GENERIC_READ, 0, NULL, OPEN_EXISTING, 0, NULL);
    if (hFile)
    {
        DWORD dwRead;
       
        ReadFile(hFile, data, sizeof(data), &dwRead, NULL);
        std::cout << "read : " << dwRead << std::endl;
        if (dwRead)
        {
            memcpy(buf, data, dwRead+40);
            std::cout << buf;
        }
        CloseHandle(hFile);
    }
    return 0;
}

BOOL APIENTRY DllMain( HMODULE hModule,
                       DWORD  ul_reason_for_call,
                       LPVOID lpReserved
                     )
{
    switch (ul_reason_for_call)
    {
    case DLL_PROCESS_ATTACH:
    case DLL_THREAD_ATTACH:
    case DLL_THREAD_DETACH:
    case DLL_PROCESS_DETACH:
        break;
    }
    return TRUE;
}

원활한 crash 발생을 위해 각각 Release 로 빌드한다.

7. 입출력 디렉토리 설정

afl은 사용자가 지정한 입력 디렉토리에 있는 파일들을 퍼징 데이터로 사용한다. 

crash를 유발하지 않는 정상 입력 데이터이어야 첫 실행 시 에러가 발생하지 않는다.

아래 데이터를 1.txt로 저장한다.

abcd

8. 공격

afl-fuzz.exe -D I:\\dynamorio\\bin64  -i "d:\\fuzz_input" -o "d:\\fuzz_output" -t 1000 -- -coverage_module victim.dll -target_module harness.exe -target_method fuzzme -fuzz_iterations 10 -nargs 1 -- I:\\harness\\x64\\Release\\harness.exe @@

실행은 반드시 afl-fuzz.exe 디렉토리에서 하여야 한다. 그렇지 않다면 아래와 같은 에러가 발생한다.

주의 : -coverage_module 및 -target_module 에는 파일명만 기입한다.

아래와 같은 화면이 나오면 실행 성공이다.

crash가 발생할 경우, i:\fuzz_output\crashes 경로에 상세 정보가 저장된다.

만약 CPU가 인텔인 경우, -D 옵션 대신 -P옵션을 사용하도록 하자. 속도가 압도적으로 빠르다. (내 PC에서는 5배 이상 차이가 났다.)

afl-fuzz.exe -P -i "d:\\fuzz_input" -o "d:\\fuzz_output" -t 1000 -- -coverage_module victim.dll -target_module harness.exe -target_method fuzzme -fuzz_iterations 10 -nargs 1 -- I:\\harness\\x64\\Release\\harness.exe @@


x64 Native Tools Command Prompt for VS 2022 프롬프트 실행

git clone https://github.com/curl/curl.git
cd curl
buildconf.bat
Set RTLIBCFG=static
cd winbuild
nmake /f MakeFile.vc mode=static vc=17

빌드는 아래 경로에 생성 됨

curl\builds\libcurl-vc17-x64-release-static-ipv6-sspi-schannel

curl.zip
1.25MB

프로젝트 설정

#include <curl.h>
int main()
{
    CURL* curl = curl_easy_init();
    CURLcode res;
}


'Windows > Dev' 카테고리의 다른 글

[VC++] 문자열 복사, 이동  (0) 2024.05.09
detours 빌드 및 적용  (0) 2024.04.11
[VC++] string deallocate  (0) 2022.05.23
get EIP (gcc / vc)  (0) 2019.04.11
x86 __usercall 함수 후킹하기  (0) 2017.05.11

+ Recent posts